
Start free: what your eyes and a phone app already show you
You don't need to spend a cent to start stargazing. Your eyes, given about half an hour to adjust to the dark, already resolve the Moon's craters along its terminator, the four planets bright enough to name on sight, and any meteor that crosses your patch of sky. Stargazing for beginners covers that technique in full, dark adaptation, timing around the moon phase, what to look for first; this guide picks up from there and covers what's worth buying once you're ready to go further.
A free planetarium app does the identification work your eyes can't. Point your phone at the sky and an app like Stellarium or SkySafari uses your phone's GPS and compass to label exactly which constellation, planet, or satellite you're looking at, updating in real time as you move. That solves the single most common beginner problem, a sky full of dots with no idea what any of them are, before you've spent a dollar on optics.
The best investment at this stage isn't a purchase. It's driving somewhere darker. A light-pollution map shows how many Bortle classes you'd gain by leaving town for forty minutes, and that gain does more for what you can actually see than any binoculars or telescope bought for use under an orange, light-polluted sky. Buy gear once the sky itself, not your eyes or your wallet, is what's holding you back.
Binoculars: the classic first buy
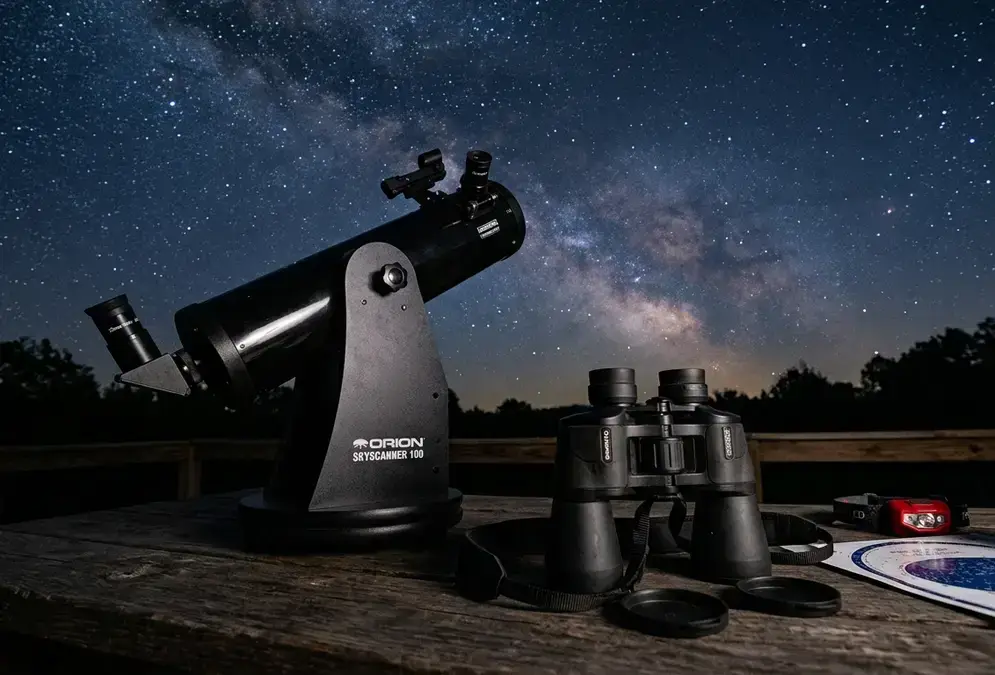
A pair of binoculars does more for a first year of stargazing than most telescopes ever will. They need no setup, no collimation, and no mount. Point them at the sky and you already have a wider, brighter view than your naked eye alone, with Jupiter's four largest moons and the craters of the Moon suddenly within reach.
5mm
How to read binocular numbers
Binocular specs are written as magnification × aperture, in millimeters: a 10x50 pair magnifies 10 times through a 50mm objective lens.[1] The first number decides how much bigger things look. The second decides how much light reaches your eye, and for stargazing that second number matters more, because a faint star or cluster isn't there to magnify if the lens can't gather enough light to show it in the first place. A compact pair built for daytime birdwatching, with a small objective lens, will always show a dimmer night sky than a full-size 50mm pair at the same magnification.
Exit pupil: the spec most beginners skip
Divide aperture by magnification and you get the exit pupil: the width of the beam of light actually leaving the eyepiece.[2] A 10x50 binocular has a 5mm exit pupil (50 ÷ 10); a 7x50 has roughly 7.1mm (50 ÷ 7). That number needs to roughly match your own dark-adapted pupil, or the extra light the binoculars gathered never makes it into your eye. A young adult's pupil dilates to about 7mm in full darkness, but that shrinks by roughly a millimeter every decade past thirty, which is why 7x50, the traditional 'astronomy binocular' spec, suits younger eyes best, while 10x50 stays useful well into middle age.
Why more than 10x backfires in your hands
Binoculars are handheld, and every one of your heartbeats becomes visible in the image once magnification climbs high enough.[3] Beyond roughly 10x, hand-shake gets bad enough to undo whatever extra detail the higher magnification promised, unless you're bracing against something solid or using a tripod adapter. That ceiling is exactly why 7x and 10x show up again and again in beginner recommendations: high enough to be useful, low enough to actually hold steady.
Telescopes: aperture is the only spec that matters
A telescope is the step up from binoculars: more light-gathering capacity, more magnification, and also more cost, more bulk, and a real learning curve. It rewards patience. It also punishes an impulse buy more than any other piece of stargazing gear, mostly because the majority of beginner telescopes are marketed on a number that barely matters.
Featured · Destination
Abisko Stargazing
Abisko's rain-shadow microclimate keeps skies clear when nearby Arctic spots cloud over. Aurora season, the Sky Station, ICEHOTEL, and getting there by train.
Aperture over magnification: ignore the '600x!' box
Aperture, the diameter of a telescope's main lens or mirror, is the spec that actually decides what you'll see, because it determines how much light the instrument gathers.[4] Magnification, by contrast, is just a function of focal length and eyepiece choice, and it can be cranked arbitrarily high on paper. Every telescope has a useful magnification limit of roughly twice its aperture in millimeters. Push past that ceiling and the image just gets bigger, dimmer, and blurrier, not better.[4] A small-aperture scope advertising '600x power' on the box is, in practice, showing a worse view at high zoom than a larger-aperture scope shows at a fraction of that magnification.
Refractor vs reflector: two ways to gather light
A refractor bends and focuses light through a lens mounted at the front of the tube. A reflector, usually a Newtonian, gathers light with a curved mirror at the back instead.[5] Refractors need almost no maintenance and deliver sharp, high-contrast views straight out of the box, but a lens that size costs far more to produce than a mirror of equal diameter. Reflectors flip that trade-off: more aperture per dollar, at the cost of the mirror needing occasional collimation, an alignment check most owners finish in under a minute once they've done it a few times.
The Dobsonian: the classic first 'real' telescope
A Dobsonian isn't a separate optical design at all. It's a standard Newtonian reflector tube sitting on a simple, low-cost altazimuth base called a rocker box, an idea popularized by amateur astronomer John Dobson in the late 1960s.[6] Stripping the mount down to something this basic frees up the budget for what actually matters, a bigger mirror, which is why the Dobsonian remains the single most recommended first 'real' telescope in amateur astronomy: for the same money, it shows more aperture, and therefore a better view, than an equivalent-priced refractor on a fussier mount.[7] Tabletop versions are the smallest and cheapest place to start; the classic full-size sweet spot sits around 8 inches of aperture, with 10 and 12-inch models stepping up further for observers ready to go bigger and haul more. When you're ready to buy an actual model rather than just understand the category, my guide to the best budget telescopes ranks specific picks by price and aperture.
Cameras and smart telescopes: capturing what you see
A camera, or one of the newer smart telescopes, is an optional next step for capturing what you see rather than just observing it live. Nothing here is required to enjoy a night under a dark sky: plenty of lifelong stargazers never touch a shutter button.
| Gear type | Best for | Setup time | Typical user |
|---|---|---|---|
| Binoculars (10x50) | Wide star fields, the Moon, star clusters | None, grab and go | Anyone starting out |
| Dobsonian telescope | Fainter deep-sky objects, planetary detail | A few minutes to set up and cool down | Backyard visual astronomy |
| Smart telescope (e.g. Seestar S50) | Shareable deep-sky images without manual astrophotography | App-guided, roughly 5 to 10 minutes | Travelers and image-focused beginners |
Traditional astrophotography: camera, tripod, star tracker
A DSLR or mirrorless camera on a sturdy tripod captures wide-field shots of the Milky Way and star trails with nothing more than a fast lens and manual settings, no telescope required. Going deeper, tracking a faint deep-sky object across a longer exposure without it smearing into a streak, needs a star tracker: a small motorized mount that rotates the camera to match Earth's own rotation. How to photograph the Milky Way walks through the actual settings and timing for that workflow; here, it's enough to know the gear exists as its own branch of the hobby, separate from visual observing. The same camera-and-tripod setup covers other night-sky events too: see how to see the northern lights and the meteor showers guide for event-specific timing.
Smart telescopes: the category that automates everything
Smart telescopes bundle an optical tube, a motorized mount, a camera sensor, filters, and stacking software into one unit controlled entirely from a phone app.[8] They handle the steps that traditional astrophotography does by hand: alignment, focus, tracking, and stacking dozens of exposures into one finished image.
Both automate the parts of astrophotography that used to take a season of practice to learn.
Who a smart telescope actually suits
A smart telescope suits beginners and travelers who want a shareable deep-sky image without learning manual astrophotography, packed into something light enough to check as carry-on luggage. It suits less well anyone chasing the live, eye-to-eyepiece experience that binoculars or a traditional telescope actually deliver: watching a phone screen update a stacked image isn't the same feeling as looking straight through an eyepiece at light that just finished a years-long journey to reach you.
Accessories that matter more than a second eyepiece
A handful of cheap accessories do more for a night under the stars than any upgrade to your main optics. None of them cost much, and all of them solve a real, specific annoyance that shows up on your first or second time out.
A red flashlight, or a white one with red cellophane taped over the lens, lets you read a star chart or find dropped gear without wrecking the night vision you spent half an hour earning. Light-pollution filters, broadband or dual/narrow-band versions that isolate specific emission wavelengths, screw onto a camera lens or telescope eyepiece and improve contrast on nebulae from skies nowhere near pristine, a useful add-on for both traditional and smart-telescope imaging.
A short list covers most of what actually gets used, season after season:
Recommended tours
Tours are selected for quality, not commission. I earn a small fee if you book — at no extra cost to you.




- A red flashlight or red-filtered headlamp
- A light-pollution filter, if you shoot from a city or suburb
- A stable tripod or tabletop mount for cameras and smart telescopes
- A dew shield or lens cover for humid nights
- Spare batteries or a power bank, since cold drains them fast
None of this is essential on night one. All of it earns its place by night five.
How to choose: matching gear to your budget and goals
Every category above answers a different question, and the honest advice is to buy in order rather than jumping straight to the gear that looks the most impressive in a product photo. Buy less than you think you need, and buy it in the right order: eyes, then binoculars, then everything else. Skipping straight to a telescope, or worse, a smart telescope, before you've spent a season with binoculars usually means expensive gear gathering dust in a closet by the following spring.
Buy less than you think you need, and buy it in the right order: eyes, then binoculars, then everything else.
What a usable kit costs at each tier
A usable kit at the bottom tier costs less than a nice dinner out: a free app plus a decent pair of 10x50 binoculars. A beginner tabletop Dobsonian sits a clear step up from there, and the classic full-size 8-inch Dobsonian costs several times that again, though it remains the best light-gathering value at its price point of any telescope design. Smart telescopes start higher still and climb from there depending on the model, since you're paying for the camera sensor, the stacking software, and the automation, not just the optics.
Matching gear to what you actually want to do
If you mostly want to relax under a dark sky and actually recognize what's up there, stop at binoculars and an app; a telescope will not make casual stargazing more enjoyable, it mostly adds setup time. If you want to see genuine detail on Saturn's rings or track down a faint galaxy with your own eye at the eyepiece, a Dobsonian earns its cost and its size. If the goal is a shareable photo rather than a live view, and hauling a full imaging rig sounds like the wrong hobby, a smart telescope closes that gap. And if your actual bottleneck is a light-polluted backyard rather than a gear shortage, the best dark sky parks in the world will do more for what you see than any purchase on this list.